Changing the motion sensor in your V3 Mamava pod is pretty simple. (Mamava pods with the serial number 768 and lower are V3 pods, and come with this motion sensor).
Tools you’ll need
- A Phillips head screwdriver
- A small flathead screwdriver
- Small pliers
- Electrical tape
Instructions
Adjust your new motion sensor.
- Use your flathead screwdriver to gently pop off the button face below the white translucent “eye” of the motion sensor.
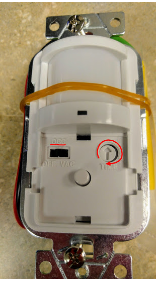
- Set the three-position switch (in the upper left corner of the button face) to the middle “OCC” position.
- You can adjust the time on the small dial labeled “Time” in the upper right corner. Use your flathead screwdriver to turn the arrow clockwise to increase the time the lights/fan stay on or turn the arrow counterclockwise to decrease the time. We recommend turning it all the way to the right.
- With the arrow turned all the way to the right, the lights/fan in the pod will stay on for 20 minutes. If the arrow is turned all the way to the left, the lights/fan will only stay on for about 30 seconds. When the arrow is pointing to the “11:00” position the lights will remain on for approximately 10 minutes.
- Keep in mind that the time it takes breastfeeding parents to pump or nurse varies, but most will need about 30 minutes between set up and clean up.
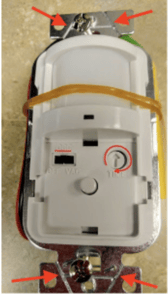
- Use your pliers to break off the four “ears” on either side of the top screw holes by bending them back and forth at the crease.
- Pop the button face back onto the bottom half of the motion sensor.
- Use your Phillips head screwdriver to unscrew the four screws on the faceplate of the outlet.
- Remove the outlet faceplate.
- Before you remove the old motion sensor, take note of the wire locations so you can reattach the new one in the same position. For reference, the green wire connects to ground, the black wire connects to hot (or supply), and the red wire is the switched feed. The yellow wire isn’t used at all, so wrap the end with electrical tape.
- Insert the new motion sensor and reattach the faceplate.