Realigning your pod door may resolve all of these problems and make sure it’s fully functional. This article will guide you through the door realignment process. You may also want to check out this video on pod leveling for additional help.
Tools Required
- 9/16ths socket wrench
- 5.5 mm hex key (or 7/32” equivalent)
Optional
- Light working gloves are recommended as some of the edges are sharp
Step 1: Access the leveling hardware inside your pod.
- Enter the pod using the Mamava app or the keypad code.
- Remove the adhesive covers on the beauty panels, located below the benches, and stick them next to the rotolock holes.
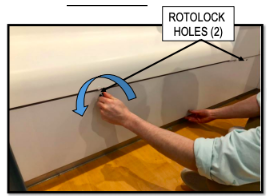
- Use a hex key to unlock the two rotolocks on each beauty panel. Turn the left rotolock clockwise and the right lock counterclockwise.
- Remove each of the beauty panels by pulling the top of the panel out first to allow the bottom flange to disengage from the chassis.
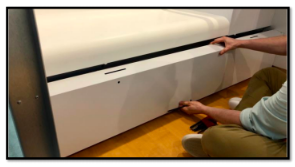
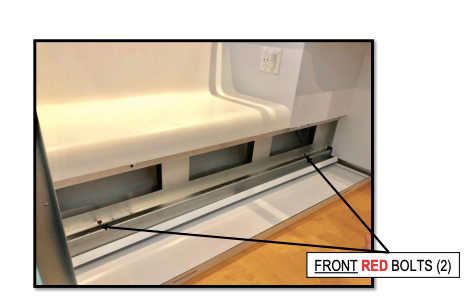
- With the beauty panels removed, you’ll find red bolts in the chassis that are the top of the leveling feet. There are four leveling feet under each bench, two in the channel closest to you, and two right behind them that are obstructed from view by the bench frame.
Step 2: Raise the leveling feet to enable the casters.
- Use your socket wrench to loosen each of the eight bolts (counterclockwise) until they turn easily by hand to raise the leveling feet.
- Continue to raise the leveling feet by hand at least another inch to ensure they don’t touch the floor.
Step 3: Lower the leveling feet.
- Begin by turning the bolts on the inside channel on both sides of the pod, clockwise by hand until they touch the floor. You’ll know you’ve hit the floor when you can’t turn them anymore. Lower the leveling feet will raise that portion of the chassis.
- Tighten each bolt two full turns with a socket wrench.
- Turn the remaining bolts in the outside channel clockwise by hand until they touch the floor.
- Turn each of the remaining four bolts two full turns with a socket wrench.
Step 4: Check pod function.
- Check the door to make sure it’s not rubbing against the door jam. If it is, readjust the leveling feet as needed.
- Lock the deadbolt. There should be no resistance while locking. If there is, readjust the leveling feet as needed.
- Make sure the gap at the top of the door is parallel. If not, readjust the leveling feet as needed.
Step 5: Reassemble your pod.
- Hook the bottom flange of each beauty panel onto the chassis, then slide the top flange between the chassis and the bench. You may need to bend the bottom flange down prior to installing. It should be square to the panel to catch the chassis correctly.
- Lock the four rotolocks with the hex key.
- Cover the holes with the adhesive covers.
- Plug the pod back into a wall outlet.