
The Pod Control Device (PCD) is the "brain" of the Mamava pod that allows access through the Mamava app and powers the lock, lights, and fans. You’ll find instructions for replacing your Mamava pod’s PCD below.
A malfunctioning PCD could be the root cause of your pod’s problems, contact us so our Service team can help you troubleshoot.
If you need to replace your pod’s PCD, we’ll help coordinate a replacement. Send back your old one* within 45 days (we’ll include a return shipping label) and the replacement PCD is free! Please note that if we don’t receive the old PCD, you will be charged $400.
*If you have a v1 PCD, there’s no need to send it back to us.
If you would prefer to have a technician replace your pod’s PCD, we can send you a quote for that service. Please contact us for more details.
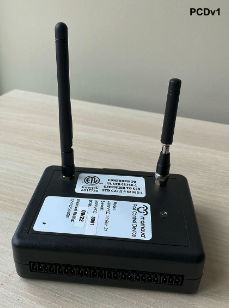
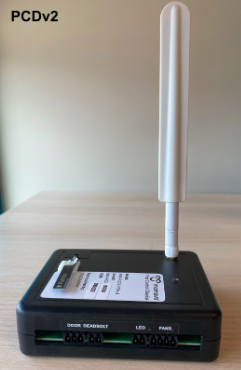
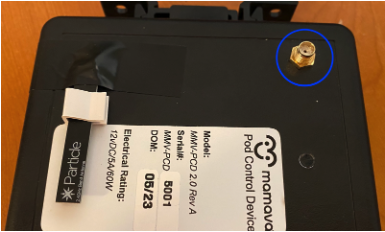
Identify which PCD you have in your pod:
Installing a PCD
Instructions are for Mamava XL V5 (formerly ADA V5), Mamava Original V5, Mamava XL V4 (formerly ADA V4), Mamava Original V4 lactation pods, Mamava Solo v1, Mamava Solo v1.1, Mamava Solo v2.0, and Mamava Solo v2.1.
Tools required
- #2 and #3 Phillips head screwdriver
- Pliers for removing plastic rivets
- A 6’ ladder
- New PCD (supplied by Mamava)
- Return label to send old PCD back (supplied by Mamava as needed)
Instructions
- Unplug the pod from the exterior wall outlet.
- Use a ladder to access the roof of the pod.
Getting your pod ready:
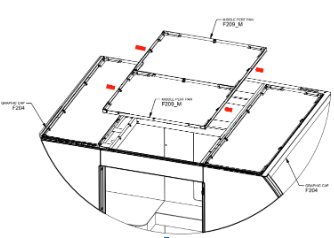
V5 XL
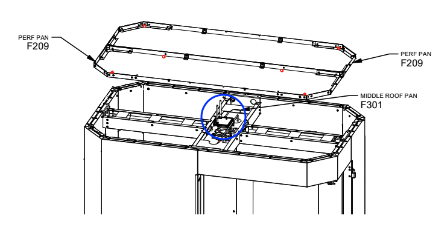
- Remove the 4 plastic rivets holding the two middle perf pans (F209) in place, then remove the pans.
V5 OG
- Remove the 4 plastic rivets holding the perf pan (F209) in place and remove it from the pod.
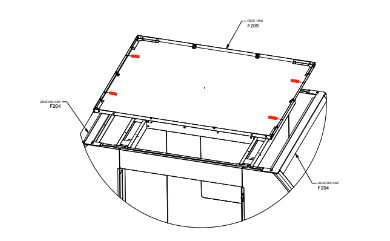
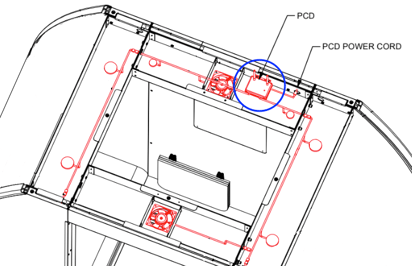
- The PCD is located in the middle roof pan.
V4 XL
- Remove the graphic caps (F104), perf pan (F109), and roof caps (F103) by removing the 7 screws shown in red below.
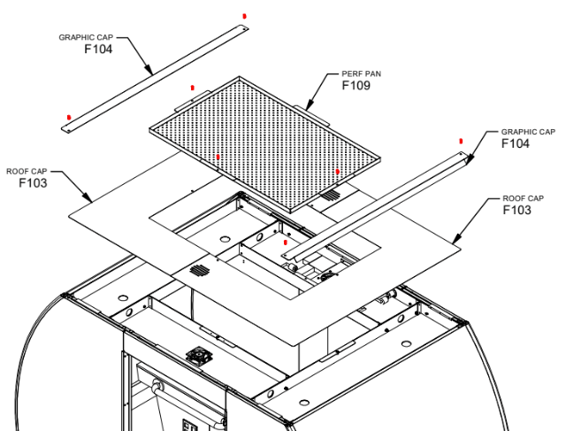
V4 OG
- Remove graphic caps (F104), perf pan (F109), and roof caps (F103) by removing the 7 screws shown in red, below.
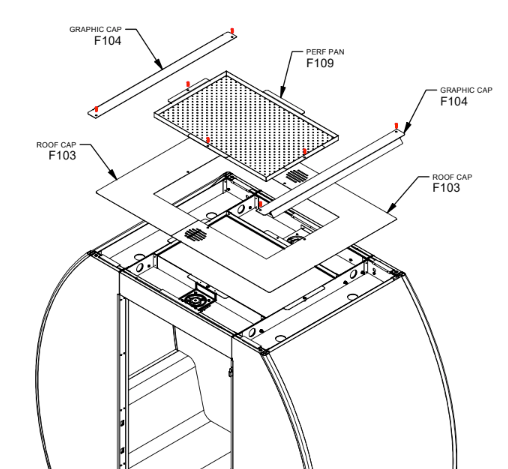
- The PCD is located in the back roof pan.
Solo v1.1
- Remove the 6 plastic push rivets to release the perf pans (F209) from the pod. The PCD is located in the middle roof pan.
Solo v2
- Push up in the middle of the roof panel to release the sides, then pull the panel out of the roof pan.
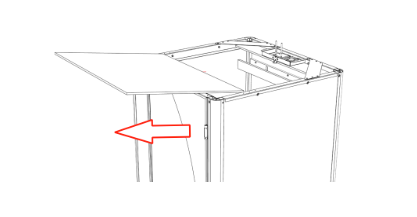
- The PCD is located in the roof pan tray in the middle of the back wall.

Replace the PCD
- Place your ladder inside the pod.
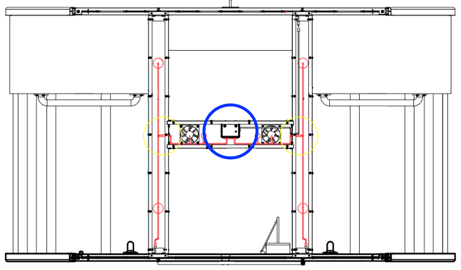
- Access the PCD and unplug the black power cord from the PCD (located on the right side). The green light will turn off.
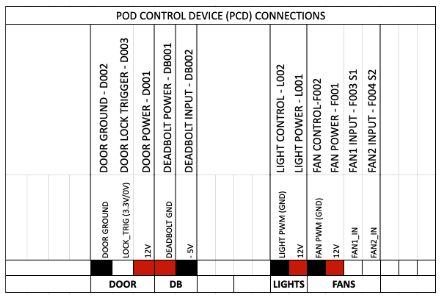
- Use the wiring diagram below to transfer all wire connectors into the new PCD. If there are harnesses from the old PCD that do not have a port in the new one, it’s fine to leave them disconnected.
- Remove the old PCD from the mounting bracket and install the new one in its place.
- Plug back in the new PCD.
*If you have a PCD v1, there’s no need to send it back to us. If you have a PCD v2, please use the provided return shipping label to send it back. Reference photos for which PCD you have are found at the top of this article.
Put Your Pod Back Together
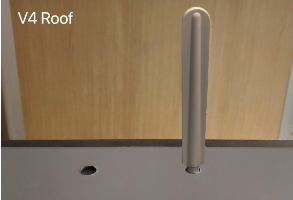
V4 OG/ XL
1. Install the roof cap that covers the PCD. Be sure to align the holes in the cap with the PCD below.
2. Thread the base of the blade antenna through the hole in the roof cap and secure it to the PCD. Be sure the antenna is snug.
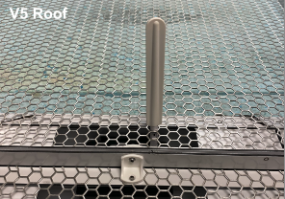
V5 OG/ XL
1. Install the perf pan onto the pod (as well as the privacy panel if applicable). Be sure to align the holes in the panel with the PCD below.
2. Thread the base of the blade antenna through the hole in the perf pan and secure it to the PCD. Be sure the antenna is snug.
Solo v1.1
1. Install the right perf pan onto the pod (as well as the privacy panel if applicable). Be sure to align the holes in the panel with the PCD below.
- Reconnect the pod to the exterior wall outlet.
- The green light on the PCD should illuminate immediately and may blink or flash as the PCD connects and boots.
- Within a minute the lights and fans should turn on, then turn off after 30 seconds. This is the PCD rebooting.
- Before replacing the last perf panel, run through initial tests to ensure the PCD is functioning properly:
-
-
- Door unlocks with keypad code 8008.
- Lights and fans come on upon entry.
- Lights and fans stay on after the deadbolt is engaged.
- Interior outlet works.
-
5. If the pod is working properly, complete the reassembly of your pod’s roof using the first few steps in these instructions in reverse.
6. If the pod is not working properly:
-
- Ensure all the connections are in the correct PCD port and pushed in securely.
- Reboot the PCD as you did previously by unplugging and plugging the pod into the exterior outlet.
- If the pod is still not working, please contact Mamava so we can help with additional troubleshooting.
7. Now it’s time to alert the Mamava team! Please email service@mamava.com or call (802) 347- 2111 to let us know that your PCD has been changed out.
8. Once we update your information, the app will recognize your pod and you can test functionality with the instructions below.
Friendly reminder—if you don’t call us to let us know your PCD has been updated, your pod will not sync with the app, and breastfeeding parents won’t be able to unlock it.
Test Your Pod
After your pod’s information has been updated in our system, please run the following tests.
- Open the Mamava app.
- Verify that the description of your Mamava pod in the app matches the physical description.
- Make sure your pod displays as “available” (green) when you’re standing outside the pod and it’s vacant.
- If the app lists your pod as “available,” unlock the door, enter the pod, and lock the door behind you.
- Once you’ve engaged the deadbolt, the pod description on the app should turn to "occupied" (red).
- Use the in-app experiences.
- Dim the lights using the Mamava app.
- Dim the lights using the Mamava app.