XL, Original, Solo V1/V1.1 Pods
As soon as the door opens, the lights and fans should turn on. The timer is automatically set for 30 seconds to allow breastfeeding parents time to enter the pod and get settled. Once the deadbolt is engaged, the lights and fans should stay on for the duration of a pumping or nursing session. Another timer is set for 30 seconds of courtesy lights and fans once the deadbolt is unlocked and the occupant exits the pod.
Solo V2 Pods
The lights and fans should turn on as motion is sensed. This may mean stepping inside the pod to activate the lights and fans. Lights and fans will continue to stay on for 30 minutes after last sensing motion.
If the lights and fans do not turn on in your Mamava pod, here are a few key tests to run to gather more information. If you need our help, please let us know the results of these tests so we have all the information we need to resolve the problem.
Confirm power is running to pod
- Locate the GFCI wall plug extending from the back of the pod and connected to the power source. Confirm that the green light on the wall plug is illuminated. If the green light is not illuminated, reset the GFCI plug and check that the wall outlet is getting power.
- See if you can open the door without the keypad code, app or key. If a pod is not getting power, it will not be locked. If you are able to get into the pod without the keypad code, app or key, confirm your pod is plugged into the wall, reset the GFCI plug and check that the wall outlet is getting power.
- Plug a device into both the USB outlet and wall outlet on the interior of the pod and confirm both are working. If neither outlet is working, but the exterior wall outlet is working, there is likely a bad connection of the GFCI plug. If the interior outlets are working, but the lights and fans are not working, there could be a bad connection between the 12V AC/DC adapter and the PCD in the ceiling. In both cases, contact us for more information.
Test the keypad
- Push buttons on the keypad. Do the buttons illuminate when you push them? If so, the keypad is getting its power from the PCD and/or the backup battery.
Test the plunger switch (not applicable to Solo V2 pods)
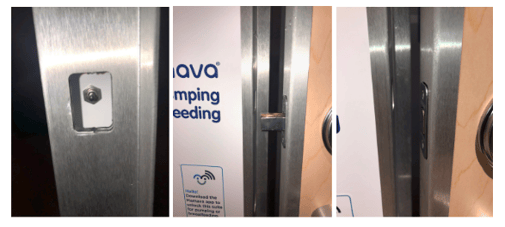
When the deadbolt is engaged, it should depress a switch in the left door jam. (You can see this illustrated in the photos above.) That plunger switch should turn on the lights and fans when the pod is occupied.
-
Use your finger to engage the switch inside the left door jam. Do the lights and fans come on when the button is pressed in? If it doesn’t, the plunger switch or the wire harness may be the root problem. Please reach out to Mamava for more troubleshooting and/or a replacement.
-
Open the door as wide as possible. On the right door jam there are three metal pins in the middle of the door hinge. These contact the three metal nodes located on the door. Use a metal paper clip and simultaneously tough just the top two pins that are protruding from the door jam. See if the lights and fans come on. If they don’t, there may be an issue with the wire harness connection. Please contact us for troubleshooting.
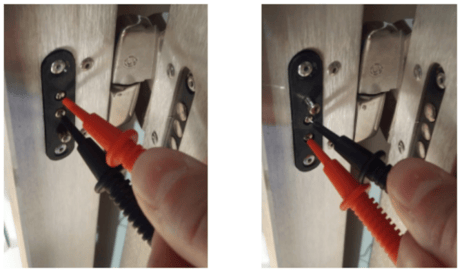
Take a meter reading (not applicable to Solo V2 pods)
This will require a Multimeter capable of measuring a minimum of 100VDC.
- Measure the voltage of your pod, by applying the meter directly on the pin inside the door hinge and depress it.
- Place the red meter lead on top and the black in the center. (See figure below left). The top and center pin should read around 11.4 VDC.
- Move the red meter lead to the very bottom and leave the black on the center (See figure below right). This should read about 3.2VDC.
If you find the results of the test fail, then contact Mamava to get a replacement. When it arrives, you can follow these instructions for installation. You also have the option to have a service call and a technician will replace the part for you. Let us know if you want this option and we will send you an estimate.
Check connections (for Solo V2 pods)
- Remove/push up on the roof panel. Ensure that the two wires at the top left of the door frame interior and the two wires at the top right interior of the door are connected.
- Ensure that the two wires in the left corner of the light fixture are connected.
- Pull up on the shelf top. Ensure that the black wire that exits the wire cover is connected into the power supply located on the back of the shelf fascia.
- Ensure that the male orange plug extending from the side of the outlet box is plugged into the female orange plug on the end of the GFCI cord.
- Ensure that the black male plug located on the side of the outlet box is connected into the power supply.
If all wires are connected and lights and fans are still not turning on, please contact us.