Short Distance Relocations
Certain models of XL, Original Flex, and Solo pods can be moved short distances on caster wheels. The leveling feet are raised or lowered to enable movement of the fixed caster wheels and provide stability when in its final location.
The Mamava Slide can be moved short distances on glide feet.
XL and Original Pods
Required Tools
- 5.5 mm hex key (or 7/32” equivalent)
- 9/16" socket wrench
1. Access the leveling feet.
If your pod is an XL V6, simply pull off the beauty panels.
- Enter the pod using the Mamava app or the keypad code.
- Remove the adhesive covers on the beauty panels, located below the benches, and stick them next to the rotolock holes.
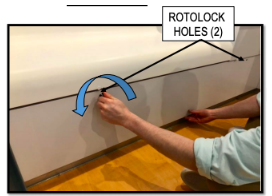
- Use a hex key to unlock the two rotolocks on each beauty panel. Turn the left rotolock clockwise and the right lock counterclockwise.
- Remove each of the beauty panels by pulling the top of the panel out first to allow the bottom flange to disengage from the chassis.
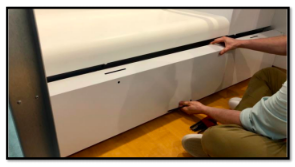
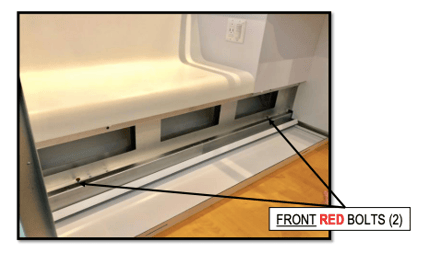
- With the beauty panels removed, you’ll find red bolts in the chassis that are the top of the leveling feet. There are four leveling feet under each bench, two in the channel closest to you, and two right behind them that are obstructed from view by the bench frame.
2. Raise the leveling feet to enable the casters.
- Use a socket wrench to loosen each of the eight bolts (counterclockwise) until they turn easily by hand to raise the leveling feet.
- Continue to raise the leveling feet by hand at least another inch to ensure they don’t touch the floor.
3. Relocate the pod.
- Unplug the power cord from the wall.
- Confirm there are no obstructions on the path of travel that could get in the way of moving the pod.
- With one person on either end of the pod, push using the aluminum corners of the pod for grabbing points. Do not push directly on the curved panel as they can crack easily when pressure is applied.
4. Ensure the pod is properly leveled in its new location.
- Ensure that there are no gaps in the header above the door.
- Ensure that there are no gaps on the back edge of the bench.
- Ensure that the shelf is level.
Note: If you find that your pod is not level, watch this video on how to realign your pod or this article on how to realign your pod door.
5. Lower the leveling feet.
- Begin by turning the bolts on the inside channel on both sides of the pod, clockwise by hand until they touch the floor. You’ll know you’ve hit the floor when you can’t turn them anymore. Lower the leveling feet will raise that portion of the chassis.
- Tighten each bolt two full turns with a socket wrench.
- Turn the remaining bolts in the outside channel clockwise by hand until they touch the floor.
- Turn each of the remaining four bolts two full turns with a socket wrench.
6. Check pod function.
- Check the door to make sure it’s not rubbing against the door jam. If it is, readjust the leveling feet as needed.
- Lock the deadbolt. There should be no resistance while locking. If there is, readjust the leveling feet as needed.
- Make sure the gap at the top of the door is parallel. If not, readjust the leveling feet as needed.
7. Reassemble the pod.
If your pod is an XL V6, install the beauty panels at an angle by aligning the black
clips of the beauty panel with the black clips on the seat base. Push gently until the clips snap into place.
- Hook the bottom flange of each beauty panel onto the chassis, then slide the top flange between the chassis and the bench. You may need to bend the bottom flange down prior to installing. It should be square to the panel to catch the chassis correctly.
- Lock the four rotolocks with the hex key.
- Cover the holes with the adhesive covers.
- Plug the pod back into a wall outlet.
8. Tell the Mamava team the pod’s new location!
- Once you’ve moved your Mamava pod to its new location, let us know where it is and how you want it listed on the app by filling out this short form.
Solo Pods
The below instructions are for Solo pods with caster wheels. If the pod you're moving does not have caster wheels, please move to the section on pod disassembly.
Required Tools
- Adjustable wrench
1. Raise the leveling feet to enable the casters.
- Lie down on the ground and look beneath the base of the pod to locate the leveling feet in each corner.
- Use an adjustable wrench to loosen the nut of the leveling feet by turning counterclockwise.

- Use the wrench on the flats, located right above the foot, to raise the whole assembly off the ground. Be sure the foot is raised completely off the ground, allowing the caster wheel to support the pod's weight
- Repeat for all four leveling feet.
- The pod should now be resting on the caster wheels.
2. Relocate the pod.
- Unplug the power cord from the wall.
- With one person on either end of the pod, push using the aluminum corners of the pod for grabbing points. Do not push directly on the wall panel.
3. Lower the leveling feet.
- Lie down on the floor with your adjustable wrench in hand.
- Use the adjustable wrench to turn each leveling foot until they touch the floor. You’ll know you’ve hit the floor when you can’t turn them anymore. Lowering the leveling feet will raise that portion of the pod.
- Use the adjustable wrench to tighten the bolt on each leveling foot.
4. Check pod function.
- Plug the pod back into a wall outlet.
- Check the door to see if it rubs against the door jam. If it does, readjust the leveling feet as needed.
- Lock the deadbolt. There should be no resistance while locking. If there is, readjust the leveling feet as needed.
5. Tell the Mamava team the pod’s new location!
- Once you’ve moved your Mamava pod to its new location, let us know where it is and how you want it listed on the app by filling out this short form.
Note: If you find that your pod is not level, read this article on how to realign your pod door.
Long Distance Relocations
If you need to relocate your pod to another floor or to a distant location, we recommend that you completely disassemble the pod before you move it. Follow these disassembly instructions:
XL V5 (formerly ADA V5) Disassembly Guide
XL V4 (formerly ADA V4) Disassembly Guide
Solo V2.0, V2.1, and V2.2 Disassembly Guide
Note: The Mamava Solo V1.1 and V1 pods do not have caster wheels and must be completely disassembled to move. Visit this article for Solo V1.1 disassembly instructions and this article for Solo V1 disassembly instructions